
Building up More Color

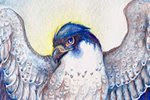
This stage focuses more on building up the color on the feathers. Painting with watercolor involves a lot of layers, so while this may seem like an insignificant step, it's actually the result of a number of layers. If you try to achieve this depth of color in one layer alone, it's not going to look right. I used a combination of raw umber, sepia, and Van Dyk brown for the upper wings, with some raw sienna for the reddish parts on the secondaries. For the legs, I used Payne's gray to start painting in the shadows of the fur.
Ground and Pillar Texture

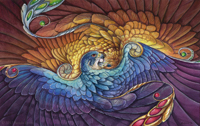
On both the ground and pillars, I painted in cracks to give the place an old, worn feel. Using a bit of white gouache, I painted along the edges of the cracks to give even more dimension. I also added more detail to the banners, adding shadow along the top which is being cast by the foliage of the trees they're attached to. Otherwise, they look like flat shapes of color.
Finished Painting

The foreground pillar was bothering me with how flat it looked, so I added a shadow to the left, which brings more attention to the subject of the painting - the gryphon.
For the first part of this progress post, please see Allegiance Work in Progress Part 1: http://featherseeds.blogspot.com/2012/05/allegiance-work-in-progress-part-1.html
just a thought, i think the banners may look a bit "flat" because unless they are pinned down, a flag that is hanging like this has sort of a naturally wavy border and would not hang with perfectly straight lines like this.
ReplyDeleteanyhow this looks awesome!
Unknown - Agreed. I discovered this right around when I put the first few layers down! By that time it was too late to curve them up a bit. Definitely something I'll know for next time, though!
ReplyDeleteBrenda,
ReplyDeleteIt was awesome meeting you at Dragon*Con this year! Thank you so much for taking the time to chat with me about your work and the wing library! I've spent a bit of time checking it out and I can't wait to get sketching :)
I really love how you post your progression in your pieces. The Radiance print I purchased has even more depth now, I can't wait to get it hung up in my office.
Keep up the great work, I hope we can chat about birds and painting again soon!
All the best,
Katie B
Katie - it was great talking to you! I'm glad you found the wing resource useful. And thanks again for giving the print a good home - it means even more to me when work is paired with people like you who really appreciate it. If you ever have any questions about birds or wings or art, just let me know - I love helping out!
ReplyDelete