About a year ago, I started branching out a little, making leather feather pendants and leather wing pendants. These were still mostly painting and little tooling, but I started discovering that I could make things out of leather aside from just masks. In October of 2012, I finally bought a new recurve bow after planning and saving up since the beginning of the year. I've been involved with archery since 2001, but hadn't picked up a bow since 2007 for a variety of reasons. Getting back into archery inspired me to create my own archery accessories. My first inspiration was to create the one item I don't have yet, which is a quiver...but that's far too ambitious a project just yet! I realized I had to practice on something smaller, so I decided to try my hand at an arm guard.
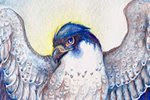
Oak Falcon - Leather Archery Arm Guard (Version 1) - October 2012


This was my first attempt, back in October of 2012. I created a few sketches for the falcon, settled on this design, and transferred it to my leather. I had a new ceramic swivel blade (used to cut lines into the surface of the leather), which doesn't go dull like metal swivel blades. However, the blade I had was a straight blade, meaning it was thick and meant mostly for larger tooled pieces. I ran into a lot of problems with my small, detailed design, namely the blade 'digging up' my leather around corners. It was probably 60% user inexperience and 40% 'wrong tool for the job'.
I also did not case the leather correctly. Casing leather is the process of wetting the leather and letting it sit long enough for the moisture to travel through the leather, while the very top of the leather dries to the point of it returning to its 'dry color.' The interior of the leather is still slightly damp, however, meaning when you use tools such as stamps, you get a nice beveled edge. Leather that is too dry throughout will result in the tools not pushing down far enough into the leather. Leather that is too wet throughout (as I learned) will result in the leather becoming 'mushy' and being too pliable. Imagine working with clay - if the clay is too firm, it won't shape right. If it is too wet, it won't keep its shape and simply squish around. My leather was too wet when I tooled it, so the tooling ended up very sloppy.
Once the tooling was finished, it came time to dye the leather. I was determined not to fall back on my 'crutch' of acrylic paint! I wanted to color it almost entirely with leather dyes. Before even touching the arm guard, I'd experimented on some scrap leather, using resists (Super Shene), seeing how certain colors looked over tooled spots, and testing out my leather antique gels. All in all, I realized my design was just too detailed and my demands for color were just too extreme for what I was trying to do. I used brushes to get into small areas, but overall the whole design still looked a bit sloppy. In addition to that, I tried to shade with the dye, and it didn't look the way I wanted.
When I cut the shape of the arm guard, I made the mistake of using leather shears. Since I'd never created a straight-edged piece before (leather masks always have curves), I didn't think to use anything else! Well, being a human, my 'straight cut' ended up a little wavy and irregular, as can be seen in the first image. I also decided to create straps and use buckles so it could be put on and easily tightened using only one hand. The straps ended up being very scratchy and 'pinched' when I put it on.
But in the end, I wasn't too upset with the outcome since I wasn't expecting a perfect piece. This started as a practice piece, and while full of mistakes, I learned what to do and what not to do. So a few months later, I tried my hand at creating it again.
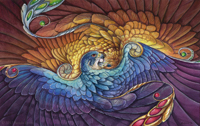
Oak Falcon - Leather Archery Arm Guard (Version 2) - January 2013


This time, I simplified the design a little, to exclude the leaves overlapping the falcon, and some of the feather layers on the breast. I also wasn't afraid this time to simplify the colors. The falcon's chest doesn't have to be extremely light, it just has to be lighter than the rest of the body. Like with the first, I used a layer of resist to prevent the overlaying dye from getting too dark. The only drawback of this is it can result in a 'blotchy' dye layer, but you can avoid this for the most part by making sure you don't leave any pools of dye.
Instead of the thick straight swivel blade, I used a ceramic angle blade, which gave me more control over detail and curves. I made sure to case the leather properly, which resulted in a much cleaner tooling. This time, I used a dark brown antique gel instead of black, which allowed me to go over the entire design without worrying about it looking too dark. The antique gel, when rubbed onto tooled leather, goes into the lines of your tooling and stays there after it's wiped from the surface. It also seats itself into the pores of the leather, so it does darken the design slightly.
Perhaps the biggest change with this version was the addition of eyelets and lace instead of straps and buckles. It's much more comfortable to wear, though it doesn't stay on as tight with just a one-handed knot. My solution will be to add a cord lock (like those used on hoodies), so it can be tightened with one hand. The edges are also much straighter, as I used a ruler and a utility knife to cut them instead of shears.
Lastly, as the dye was drying, I curved the arm guard around and kept it in a curve by using elastic bands. When the dye dried, the arm guard stayed in a curved shape. The first one was stiff in the wrong places and didn't keep a curved shape well, so this was another improvement.
There are still some improvements I can make to future arm guards, but I'm much more confident in creating more 'traditional' leather work after making these two arm guards. Perhaps once I've made a few more, I'll find the courage to try making a tooled quiver!