Thursday, September 29, 2011

Omar - Barred Owl Work in Progress

I was asked to paint a watercolor portrait of Omar, a barred owl who was a long-time resident of the , and sadly died recently. After receiving several reference photos to capture Omar's personal appearance and a description of the bird to capture his personality, I started work on a portrait of this wonderful bird.

Sketch


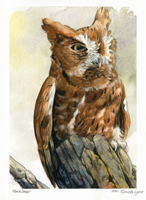
Omar was described to always be looking at his handler, or whomever was speaking to him. The client explained that it was strange seeing photos of him from the side, because she usually only saw him from the front. This is why I chose to paint him from the front, to show him in a way everyone was familiar with - looking right at you. Two of Omar's personal characteristics include a diamond shape on his forehead, and the right side of his facial disk is higher than the left.

Basic Shadows


At this phase, I wanted to establish where the light would be coming from. I felt a dramatic light from the side would be much more interesting than a more global light. I used a combination of sepia, payne's gray, and dioxazine violet.

Markings and Deeper Shadow


Barred owls are a bit complex in their markings, although one wouldn't think it compared to barn owls and great horned owls. However, their chest feathers vary from vertical bars to horizontal - these markings are what gave the barred owl its name. In addition, the texture of the belly feathers are different than those on the chest. Painting these correctly are essential to capturing the appearance of the barred owl.

Here, I deepen the shadows and just barely begin the detail on the belly. I also put in a flat shade of brown for the eyes, which I will darken and add highlights to later. Note how the texture of the feathers differ from the tiny feathers beneath the beak, to the long, slender feathers around the beak, to the scalloped feathers on the chest. Feathers change depending on the location of the bird - the tiny feathers around the eyes would look abnormal on the chest, and vice versa. The chest at this point looks unusual because it has the most detail so far - once I begin work on the surrounding areas, the painting will start to come together as a whole.

The next post will show the next steps, and most likely include the finished painting.

Tuesday, August 23, 2011

Swamp Milkweed Nectarbird

As shown in my previous post, I went with a variation of the grisaille technique for my most recent painting. Here is the completed painting, acrylic on cold-press illustration board, 8 X 10 inches:


To start where I left off with the process, I experimented with color in Photoshop to see exactly how things would look before I started putting the glazes over the gray painting.


What I suspected was that the tonal painting was too gray for the glaze technique to be successful, and I was right. The way I was taught to do this technique was to create a tonal painting with a grayed color, meaning not pure gray, but grayed green, for example. As I started putting down glazes, I saw that the gray showing through beneath was not what I wanted for certain sections of the painting, particularly those with higher saturation. Therefore, I had to add a bit more opacity to what were supposed to be glazes.


Although I had to deviate from my original plan with technique, I do not consider this to be a failure of a project. On the contrary, I learned quite a bit on what to do (and what not to do), and ended up with, what I feel, is a good painting. For future paintings using this technique, I will make sure my tonal painting is not so gray. I also found, once I started putting glazes down, that the overall contrast was too dark. I ended up lightening a lot of the composition during the color phase, when it should have been light enough at the tonal stage. All in all, a good learning experience!

Monday, August 22, 2011

Swamp Milkweed Nectarbird - Work in Progress

Back in 2007 I painted a bird with daffodils for plumage, as part of a personal project to create a bird for each month, mirroring the month's birthflower and birthstone. These birds, which I called "Birdflowers," later morphed into "Nectarbirds." Nectarbirds were birds with the plumage of the flowers on which they fed. Whenever I go exploring and find interesting-looking flowers, I try to get good photographs and create a Nectarbird from that, which usually involves me doing some research to try to figure out exactly what flower I've found!

For DragonCon, I try to paint new Nectarbirds each year. Last year was the exception, but this year I will have two new Nectarbirds. One based on the Hedge Bindweed, and one (currently in progress), based on the Swamp Milkweed. For the Hedge Bindweed Nectarbird, I tried a technique of using acrylic on cold-press watercolor paper in a very watered-down way, more like watercolor. I can't say I really enjoyed this technique, and decided for my next Nectarbird, to try a more traditional approach with acrylic. More specifically, a medium tinted canvas, and then introducing darks and lights.


I learned a bit about the grisaille technique at SCAD, where a grayish painting is overlaid by layers of colored glazes. The technique, traditionally used with oils, works exceptionally well with acrylic also. I try to put a bit of color in my gray, but the foreground elements ended up being pure gray in the end. I am excited about adding the glazes, which to me is the most fun part of this technique.

Tuesday, June 14, 2011

Jumping Salmon - Painted Feather Progress Part 2

This is the second part of the progress of the jumping salmon painted feather. If you did not see the first part, you can find it here: http://featherseeds.blogspot.com/2011/06/jumping-salmon-painted-feather-progress.html

At this point, I begin the detail on the salmon and trees. I use white instead of a mixture of green on the trees, as I will use glazes (thinned, translucent layers of paint) to bring the color in. Atlantic salmon have a lovely silvery shimmer, which is something the client wanted me to capture in this fish. When working small, you don't have to paint every single detail with sharp accuracy - sometimes less is more. An example of this is the scales. Simple dots are enough to give the illusion of glossy scales.


I also decided to add some variation to the water. Water is rarely 'blue', and often has shades of green and brown. Even putting glazes of green over blue will make the water look more natural, instead of artificial.

Now that most of the details have been painted, it's time to add the last figure - the fisherman. Instead of sketching him with paint, I use a white gel pen. These pens are perfect for sketching on acrylic, as they are water-soluble, and if you make a mistake, you can simply 'erase' with water. I also draw in the fishing line with this pen, as it is thinner and more fluid than any brush with paint.


Painting in the fisherman was the most tricky part, since on the feather he is only about an inch tall. Again, the same technique of 'less is more' can be used on the fisherman. By using bold shadows and highlights, he pops out. And delicate detail is unnecessary - it wouldn't show up well anyway.

After adding some last details to the trees and rocks, the feather is complete. The color and contrast is different from the progress shots because instead of photographing the final piece, I scanned it. Scanners will generally give you sharper detail and are not affected by the lighting of your room, which is why it is the preferred method for digitizing traditional artwork.

Monday, June 13, 2011

Jumping Salmon - Painted Feather Progress

This painting is a commission for a friend's father, so I'm hoping he doesn't know about this blog (I'm quite certain he doesn't!). However, as it's been requested by several people, I decided to show the progress of a painted feather from start to finish.

With all paintings, I start with a sketch. Since I will not be transferring the sketch directly to my feather, I keep the sketch loose. I am not familiar with salmon anatomy, so I did quite a bit of research on these fish while sketching. There will also be a fisherman in this painting, so I not only had to research Atlantic Salmon, but also the specifics of fly fishing!


To prepare the feathers (my canvas), I take two turkey tail feathers that look good layered on top of one another. I try to use two feathers that curve in the same direction (both from the right side of the tail, for instance), as this creates a nice layered double feather. To attach the feathers together, I use PVA bookbinding adhesive, which is acid-free and archival. This glue is perfect, as it dries quickly and clear.

Once the glue is completely dry, I spray the feathers with workable fixative. The fixative helps prevent the feather vane from separating, though it is not a perfect hold, and I still need to be careful when painting the first layer. Once the fixative is dry, I paint the first layer. At this point, I simply block in the main colors in watered-down acrylic. This also serves not only as an underpainting, but the acrylic also acts as a 'glue' to lock the barbs of the feather together, preventing it from opening.


At this point, the feather looks extremely sloppy, but at the beginning the main purpose is getting the feather 'locked.' The second step is to fill in the colors a bit more, but not putting in detail yet.


One thing to remember when painting feathers is that the paint seems to dry a bit slower than on canvas or board. I use this to my advantage to blend, particularly in the salmon where I want a smooth blend between the darker top half and the silvery bottom half. Here I start putting in minor details, still blocky, in the fish and background.


Once the main underpainting is done, I start on the detail. When I work with detail, I tend to work fast, as I want to be able to blend while the paint is wet. Unlike oils, which take several days to dry, acrylic dries in a matter of minutes, and although it dries slower on feathers, you still need to work quickly if you want to blend on the feather itself.

Although I have several reference shots of flowing rivers, I don't like to simply paint a scene right from nature. I see the opportunity with the salmon's wonderful curve to move the water around it and compliment both the form of the fish and the shape of the river. I've taken liberties with the water, not focusing so much on pure water physics, but seeking a more aesthetic river.


The next post will contain the second half of progress, as well as the finished feather.

Sunday, June 12, 2011

Wind Spirit Starling Mask - From Start to Finish

The second mask I was commissioned to do was a variation on my Wind Spirit mask, but with Winter Starling mask colors.

This mask looks huge when tooling, as it takes a rather large piece of leather. However, the wings wrap around the head, so it is not as 'huge' as one might think by looking at it at the tooling stage. Below, you can see the mask fully tooled and cut out:


Once shaped, you can see how it loses a lot of its volume, but becomes a very well-fitted mask:


I use blue dye, because this will be a dark mask. Although in my previous post I mentioned using a compliment as the base dye color (as with the Summer Bird Mask), in this case, I felt using blue would work better. There are no set-in-stone 'rules' when I work. If I feel something will work better, I generally follow my instincts:


I try to use the base color of blue as a springboard for my other colors. This mask will vary between green, blue, and purple, so I use thin layers mixed with a pearlescent white to create an iridescent effect:


Since punching holes for the ribbons would ruin the winged effect of this mask, I instead glued a piece of leather with a hole on each side, and threaded the ribbon through. Since the adhesive is extremely strong, I do not worry about it pulling loose. One 'test' I do whenever I glue something that will be tugged on a lot (such as ribbon) is I pull it firmly. If I feel or see any give, I reglue it. Both sides passed the 'tug test', and after varnishing, this mask was complete, and was sent on its way to the client.

Summer Bird Mask Completion

While I finished this mask a while ago, I still want to post the second part of the progress post for the Summer Bird mask, as well as a look at creating my Wind Spirit mask (which will appear in a separate blog post).

After shaping the Summer Bird mask, I applied a layer of leather dye. The dye I use is alcohol-based, and also stiffens the leather a little bit more. Using scrap bits of leather, I cut out additional leaves, dyed and shaped them, and once dry, glued them onto the mask. Once the glue and dye is dried, I go over it with a water-based sealer (Mod Podge), to create an acid-free barrier between the dyed leather and acrylic paint. Since the dye goes on with variation, I painted a layer of burnt sienna as a 'base layer.'


You may ask, "well if this mask is going to be mostly green and yellow, why did you put a reddish base down?" I find using a color's compliment as a base serves to make that color more vibrant, as well as make its shadows more solid. As most of this mask will be shades of green, I used its compliment - red - as a base. You can see the first layer of paint, with the reddish base showing through:


At this point, I usually work pretty fast, and my painting style isn't 'step by step' enough for me to take a lot of photos. Instead of adding shadows all at the same time and then highlights later, sometimes I go back and forth. Here is the mask completely painted, minus the stone:


As you may remember from the first version of this mask I created in 2009, I simply glued the stone on the mask without a bezel of any kind. I didn't like this for two reasons. For one, I don't feel the 'stuck on' look has a very 'clean' appearance. On the forehead, the leather is still slightly curved, and the flat back of the cabochon does not sit perfectly flat, and thus you get gaps. The second reason is stability. Although the adhesive I use (Incredible Goop) is extremely strong, a stone that is simply stuck on is not as secure as one that is 'set' in the mask. Because of this, I decided to take a different approach.

I must thank Andrea Masse-Tognetti, known more widely as Merimask, for her tips on how to set a stone in leather. During the tooling stage, I traced the base of the stone on the leather, and then drew a second, identical oval about 1/16 of an inch in, so the hole would be slightly smaller than the base of the cabochon. After cutting out the hole, I beveled the hole inversely, meaning it would be wider on the bottom and narrower on the top. This way, it would act as a bezel over the stone.

Once the mask was shaped, painted, and ready for varnishing, I placed the stone in the hole and cut out a very thin piece of split leather. The leather I buy is regularly 11 ounces (leather thickness is measured in ounces), which is a little under 3/16 of an inch. This is very thick for leather, so for my masks, I ask the tannery where I buy my leather to cut it down to 7 oz. (a little less than 1/8 inch). By request, they sent me the thin split side, which comes in useful for things such as backing stones, as seen below:


I cut this piece big enough so I could glue it (with the Goop, again) to the back of the mask. I made sure the Goop covered both the piece of leather, and the stone, so once it dried, the stone would be set without wiggling.


I also placed sticky-backed felt over the glued-on leaves, so they wouldn't dig in or scratch the wearer's face. After a day of drying, I varnished the mask, front and back, twice, and tied on the ribbons.

Tuesday, May 31, 2011

Summer Bird Mask - Progress

I will be posting the progress of two masks, as requested by a client. The two masks I am making are the Summer Bird Mask, and the Wind Spirit Mask (the Wind Spirit Mask will be in the colors of the Starling Mask).

Here is the Summer Bird mask, at the stage where I cut in the lines with a swivel knife. Despite its name, the swivel knife is not a true knife, but rather a very sharp 'chisel' that digs a smooth line into wet leather.


Once the lines are in, I use beveling tools. The whole procedure up to this point is called "tooling," in which leather tools are used to shape the surface of the leather dimensionally. This is what gives feathers and leaves their depth. When working with leather, you can go to either extreme with tooling. I try to keep my tooling medium, as the painting stage also gives the illusion of depth.

Once I'm done with tooling, I cut out the edges, eyes, and in this case, the hole where the stone will be. In this photo, the mask is also partially shaped, and ready to go in the oven for final shaping and drying:


Shaping the mask is tricky, and I usually open the oven about 4 to 5 times to remove the mask and reshape it, as it can 'sag' as it dries. Here is the shaped mask, ready for dyeing, and then painting:

Tuesday, May 3, 2011

A Glimpse of Sky


At times the binds of the world are too strong. They pull and cut and hold your wings to the earth. But just as you feel ready to surrender to those biting vines, a sliver of blue pierces through the tangle above. And you find just a little strength left to pull and reach, and try to find the freedom you were certain you would never have.

Here is the finished painting, 8 X 10 inches on hot-press Fabriano. I ended up using a bit of colored pencil at the end, to really push the contrast. Since watercolor dries matte, it's difficult to get a truly dark black. Colored pencil leaves a bit of a sheen, and ends up allowing you to push your darks darker.

I took a new direction with this piece in terms of contrast and color. Looking at my previous paintings, I always used a lot of saturated colors, and very rarely actual black. I've always had it in my head that black is never to be used in watercolor, and that's simply not an accurate 'rule' to follow! Black dulls and deadens color when used in watercolor, but sometimes that's exactly what you want to achieve. Here, there's a lot of grayed color, which lends to the dark and helpless feeling. This piece would not have worked with my regular saturated palette.

In terms of contrast, I think I'm starting to get a bit more comfortable and confident with pushing values. Using the 'desaturation test,' I found the piece reads well in graytones as well as color. This is not usually the case with my work, as it often turns to a midtone mess when desaturated. I suppose what I learned with this piece is - don't be afraid to use black!

A Glimpse of Sky - Progress 2


Here is further progress on "A Glimpse of Sky." At this point, I have painted the midtones for the vines, and started putting in detail in the feathers. I am using a mixture of payne's gray and sepia as a nice neutral tone for the shadows.


More contrast for the vines, including some texture. I use a white Sakura Gelly Roll pen in places I want to lighten. The Gelly Roll pens are excellent for watercolor as they are water soluble, and can be moved around much like paint with a wet brush. They also tend to resist darkening as they dry, as white gouache does.

Here, I've started laying down layers for the falcon's coloring. Peregrines have a beautiful slate-blue coloration for their plumage. However, since only using shades of blue would keep the overall color scheme too analogous (greens and blues), I decided to introduce some purples. The wings closest to the sky are tinted with cerulean blue, blending closer to purple as the wings get darker at the bottom.

You can see where I have started detailing the markings on the feathers, using a mixture of payne's gray and indigo. The tricky part here is darkening the markings on the wings without darkening the overall wing! If I'm not careful, I'll end up losing all my contrast with the detail.

Monday, May 2, 2011

A Glimpse of Sky - Progress

As requested by a few people, I will be posting progress scans of a painting I am working on. The finished pencil drawing:


I wanted to capture a dark feeling of constriction. I decided on a muted color scheme, with the only source of vibrant color being the sky above.


I started by filling in the background with a wash of payne's gray. The midtone of the vines is a mixture of davy's gray and just a little payne's gray.

Next, I pushed the background even darker, with a layer of ivory black, and then a very concentrated mixture of payne's gray and sepia.


Once that was dry, I went over with a glaze of davy's gray mixed with just a touch of raw umber. The background will have faint vines crossing over and tangling, so I wanted the background closest to the sky to have the color of the vines. For the falcon, I created a gradated wash of payne's gray and sepia from the bottom to the top to capture the contrast of bright light and extreme dark within the vine 'cave'. As seen on three of the vines, they will be a mixture of chromium oxide green and raw sienna.

Wednesday, March 23, 2011

Share One Planet Sketches

I was recommended by a friend to send an invitation request to the Share One Planet competition. It is an invitation-only digital art competition featuring a number of animals of concern. I am happy to say that I was accepted and given an invitation, and I decided this would be an excellent reason to try more digital art.


There are 5 categories (technically 10, but each category has a digital painting and digital sculpture category within it). The one I chose after doing a few sketches was "Mother's Love." The first set of sketches show ideas in other categories, such as 'portrait' and 'predator and prey.'

Thinking about what a 'mother's love' is in the animal kingdom truly is about protection. Most humans have the luxury of protection by the law and society's standards, but in nature, the only law is that of survival.

The peregrine falcon is truly a remarkable creature. It is the fastest creature on the planet, yet is relatively small compared to other raptors. Young falcons are especially at risk of predation by larger raptors, particularly by golden eagles. Despite the size difference, parent falcons have been known to attack and kill golden eagles in defense of their young.


In this drawing I am trying to capture the fierce protection of the mother. Leaving the chicks to fly is risky, but the falcon's strength is in the sky...and all she needs is a bit of height and the advantage is hers.

Tuesday, March 22, 2011

Owl Women of Vaethiniel


In the deep forests of Vaethiniel there live three women - one very young, one very old, and one between the valleys of age.

Once twenty winters have passed, the greatest and brightest moon rises over the sleeping trees. In this night, the old magic is at its most powerful. It is said the three women, with their ancient gifts, gather around a cauldron that mirrors the sky. In this, the secrets of the next twenty winters are stirred, and the three women peer forth with the wise faces of owls, for only owls can read the words of the moon.


The story was in part inspired by the Perigee Moon we had on March 19th. The moon truly was blindingly bright, and we had the good fortune in Connecticut of having a cloudless night, so the true brilliance of this rare moon was at its peak. I couldn't help but wonder what ancient cultures thought when the moon suddenly appeared bigger and brighter every 18 years.

Monday, March 21, 2011

Owl Women - Progress 2

This painting is taking me much longer than I imagined, which is good! I'm spending more time thinking about color choices before jumping in. Although I have a color comp, I still need to decide how to create the colors I want, and what shadow combinations will be suitable.


Here I have put in another layer of shadow in the foreground wings, and put the first layer down for color. The great horned owl's hood is going to be a rich brown, so I used a layer of yellow ochre as a base layer. Since the barred owl's cloak will be a rich green, I used cadmium yellow. I find layering watercolor creates a tone that blends better than putting down one simple layer of thick mixed color.


Again, I found myself in such concentration I went a long stretch without scanning! Lots of detail in the feathers at this point. For the great horned owl's wing, I created a mask with tracing paper around the entire painting except that wing, then used a toothbrush to splatter white gouache and payne's gray watercolor to get the speckled appearance that great horned owls have on their wings and back.

For the sky, I mixed color with white gouache to make the color more opaque. I find this works well when I want a very rich, smooth color. At this point, I also removed the masking fluid from the moon, and painted in the branches.

Thursday, March 17, 2011

Bridge Study

It was such a beautiful day today that I got the urge to paint outdoors! My field watercolor book is woefully empty, and the last time I even touched it was early summer of 2009. Today, I went to the same place, the Oak Grove Nature Center.

The nature center has a nice pond in the center that is fed by and empties into a creek. I originally planned to paint the pond, but was drawn instead by the covered bridge that goes over the creek.


I didn't aim for completely accurate perspective, and drew the lines freehand instead of using vanishing points. The aim, however, was to practice with watercolor. I find it is much easier for me to discover proper mixtures for shadows when I am painting from life, rather than painting from imagination. It is also easier for me to 'loosen up' and allow natural mixing and flowing paint when I am not aiming for a tight illustration. I would love to be able to capture some of this ease in my tighter, illustrative work.

Also, as I painted, this red-bellied woodpecker decided to come by and see what I was up to. I must not have impressed him, since he didn't stick around for long.

Tuesday, March 15, 2011

Owl Women - Final Drawing and Shadow Stages

As seen in the previous post, I've completed the color comp, meaning it's time to transfer the drawing and start painting! Below is the drawing transferred to the illustration board, with a few last things fixed:


When adding the shadows, I try to think about what colors will work best when the main color layer is applied. I never shade with gray or black, and always use a color or combination of colors for my shadows. Since this is a night scene, I try to use a lot of blue and violet-dominated shadows.


The shadows on the barn owl's clothing are a mixture of dioxazine violet and van dyk brown, which makes it a warm, yet dark shadow, which will work well with the red of her cloak. The wings of the barred owl have a layer of ultramarine violet, indigo, and just a touch of sepia - I used this very neutral color as her wings are much more of a grayish brown than the more intense brown of the great horned owl's wings.

As feathers are translucent, the 'light gaps' are where the light of the fire will illuminate the feathers. Where the feathers overlap, not as much light gets through. This is a hard concept at first to wrap your mind around when drawing birds' wings, but inclusion of this with back-lit wings results in a much more believable wing.

A note - the pink you see on the moon is not paint, but rather masking fluid. I used masking fluid so I could apply washes freely to the sky without worrying about going over the perfect white and circle of the moon. Once I am ready to paint the branches, I will remove it.

Friday, March 11, 2011

Owl Women

I seem to have owls on the brain, lately! Much inspiration is thanks to the live owls I work with at Horizon Wings Raptor Rehabilitation and Education Center, of which I am lucky enough to see up close. You really get a better understanding of birds of prey when you see them in real life. Their movements and mannerisms are simply impossible to discover through photographs alone.

There's something so enjoyable about drawing owls. Perhaps it is because of their incredible softness and roundness. If you enjoy drawing fluffy feathers, then an owl is the perfect subject. I also associate these birds with (no surprise here) the night and the mysteries of the world when the sun goes down and the moon comes up. Owls are creatures that live with a perfect harmony with the night. Their hearing is unlike that of any bird - some owls hunt in practically complete darkness, using their asymmetrical ears to pinpoint a creature's location on the ground. Their wings have a fringe to allow them to fly with complete silence.

Below are sketches for a painting I am about to begin. Three owl women gather around a cauldron of starlight. One holds a sphere of perfect crystal, which reflects all light and allows her to see beyond the dark of night. Another carries a staff, which still grows living oak leaves and acorns.


And the finished sketch. I didn't put in as much detail, here, as I planned to incorporate the values with the color sketch:


As before, with Celebration, I used Corel Painter to create my color sketch:


Painting this will be tricky, as I have two main light sources: the moon above and the fire below. The crystal ball also gives a little light to the face of the barred owl, allowing the eye that would normally be in shadow to have a highlight.

The shadows were easy in Painter, but with a translucent medium like watercolor, it's going to be a bit more challenging. I may end up using colored pencil to really pop the highlights.

Tuesday, March 8, 2011

Ceremony

I meant to post work in progress scans as I painted this, but I got so caught up I forgot! Here is the finished painting:


The main difference between this and all my older paintings is the inclusion of two important colors I never used before: Aureolin Yellow and Rose Madder Genuine. After recently reading A Watercolor Artist's Guide to Exceptional Color by Jan Hart, I learned that the yellow I had been using previously - Cadmium Yellow - was closer to a yellow-orange instead of a pure yellow, as Aureolin is. Therefore, my 'yellows' were always darker and redder. I also had never really had a true magenta, which I now have with Rose Madder Genuine. Adding these two colors has expanded my palette immensely and solved many of the color issues I was having before.

I also discovered that Rose Madder smells just like Froot Loops. I am completely serious.

Sunday, March 6, 2011

Ceremony - works in progress

Many apologies for the long hiatus! It is a bit fitting, in a way, that my first post in a while is to show progress on a work that I had put away for a long while. I reopen a neglected art blog with a neglected painting!


I started this drawing on an 8 X 10 piece of illustration board, late in 2010 when I was struggling with technique and wanted to create a piece to experiment with. Other projects got in the way, and this got tucked away in a drawer 'for later.' Well, later is today, and I pulled it out to finish the drawing, and get started with painting.

Below is a color sketch - I'm usually very bad about doing color sketches, but I think this may help the issues I have of plopping down color on a final piece before thinking it through.


I used Painter IX to put in some color ideas and establish the lighting. The 'smoke' will be a bit more challenging with watercolor, but it will be a good opportunity to experiment with technique...which was the initial purpose of this piece to begin with!