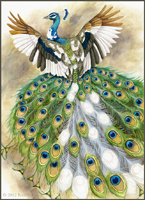
I was commissioned to create a painting featuring a great blue heron and a great egret, with the same twisting, intertwined feel as "Radiance". With the long, twisting necks of the heron and egret, I had a lot of fun coming up with ideas for composition. Finally, we settled on the below design.
Final Drawing:
As with Radiance, I drew the first bird, and then mirrored it upside down in Photoshop. This way, I was able to redraw the image so both birds 'fit' into one another. However, I left the water on the top and the bottom slightly different, since water flows unstructured and wild.
First Washes:
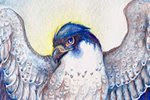
With the great egret, I had to be very careful not to go too dark. Being a white bird, I needed to chose my shadow colors carefully, and apply them in multiple, light layers. I created a color sketch that I was working off of, and to match the style of the edges of the piece being darker than the center, decided to make the primary and secondary feathers of the egret light brown instead of white. I also made the crest of the heron a vibrant blue instead of slate gray. The beaks are a light wash of cadmium yellow.
For the heron, I started with a very light wash of raw umber mixed with naples yellow for the inner wings, with a wash of caput mortuum (a reddish brown) mixed with dioxazine violet. For the first washes for the water I used washes of ultramarine blue going to pthalo blue, and then to turquoise. I made sure not to mix them too much, since ultramarine is more of a 'true' blue, whereas pthalo blue is more cyan, and turquoise is a blue-green. Mixing these blues all together would create a bit of a muddy blue, taking away the vibrancy I wanted to achieve.
Shadows:
Here I began putting in the details of the feathers. For the primaries and secondaries of the heron, I used a more concentrated mixture of caput mortuum/dioxazine violet, and for the egret I used sepia. In order to achieve the slight gradient of light to dark in the primaries/secondaries, I carefully wet the paper, then used a flat brush to gently brush a more concentrated layer of the original pigment, dark at the ends of the feathers, carefully lightening until the brush had only water at the base of the feathers.
For the heron, I am using a variety of colors, ranging from raw umber, caput mortuum, sepia and burnt sienna. The egret was a bit trickier to shade, since even a very light wash could go too dark very quickly. Most of what I used to shade the white of the egret was naples yellow with a very small amount of ultramarine violet. The blue of the tiny bits of background is a wash of indigo.
Feather DetailsL
In this step I painted several layers of feathers. As with all my watercolor paintings, sometimes it takes me 5 or 6 layers - painting, letting dry, painting, letting dry - until I build up the details enough. If you go too dark too fast, you risk losing the subtle detail of the feathers. Caput mortuum is a wonderful color for this heron, since it is a reddish brown with just a hint of purple. To really bring out the color on its neck, I laid a few washes of rose madder down. The inner-wing feather detail on the egret is more layers of naples yellow with just a touch of raw umber. To get a 'milky' appearance that blends well, I mixed it with a little white gouache in the shadows.
For the details of the beak, I used cadmium orange, and some indigo for the darker spots.
Water Details and Final Feather Details:
Unlike the birds, I did not use a lot of washes for the water. As you can see in the previous steps, I only laid down one wash until this point. For the outermost bits of water, I concentrated using a true blue (ultramarine) and used a light wash of quiacridone rose to push it towards purple. Closer in, I used turquoise and pthalo blue, and for the greenish water I used turquoise for the darker areas and very light washes of green gold. As with my first wash, I was careful not to cover the white highlights. For very very fine white spots and lines, I used a white gel pen.
I continued to use the same colors as before to build up the feather detail on the birds: for the heron, caput mortuum, dioxazine violet, burnt sienna and raw umber, and for the egret, naples yellow, raw umber, ultramarine violet, and sepia.
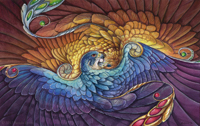
Reflected Blue Light - Final Piece:
The lighter highlights on the primaries/secondaries is just a little
white gouache. I also took a very light wash of white acrylic to soften
the shadows on the egret. I also added reflected blue from the water on the birds.
Adding reflected blue from the water is what makes this piece complete. You may have been thinking "the water kind of clashes with everything else" when seeing the previous progress shots, because the only blue in the painting was in the water, the heron's crest and the jewels, and it was a very vibrant blue. At the final stage I did two things - I added very light washes of pthalo blue (the dominant blue in the water) to the birds in places where the blue would 'reflect' off of them, and I added just a tiny bit of van dyk brown (a dark reddish brown) to the deepest shadows of the water. By adding a dark brown to the blue, it connected the blue in a subtle way with the rest of the piece. And by adding a blue wash to the rest of the piece, it connected the birds with the water, while still letting them keep their original colors.


Would you mind taking a moment to speak about your materials? Do you work on watercolor paper or illustration board? If watercolor, do you find hot press or cold press to be better for the level of detail work that you do?
ReplyDeleteWhat about brushes? What sizes do you tend to go for when doing the detail work?
As someone that's only dabbled in watercolor and is mostly self-taught with the medium, I ask so many questions because I tend toward a 10/0 brush for my smallest detail and.. gosh. I've never been able to get such lovely "lines" as you have here! Truly magnificent work.
Certainly! For this painting, I used illustration board. I use a variety of surfaces for watercolor painting, most of which being hot-press paper. I also use cold-press paper and, in this case, illustration board. I love cold-press paper, but find for my style, hot-press paper handles the paint better. Different papers/boards handle paint in different ways, so it really depends on your style which is best for you.
ReplyDeleteTo be honest, I don't use a tiny tiny brush for detail - I use a regular #4 round, and just make sure that for my detail, that it's a very sharp tip. Once a brush starts getting old and the tip frayed, I retire it to live the rest of its life as an acrylic brush.
One problem I find when using a very small brush (like a 10/0) with watercolor is that it doesn't hold enough paint to be able to make much of a mark, and the tips of those brushes are small, but not very fine. Your best bet is to use a larger, but very fine tipped brush like a #4 or #2 round. Here's the one I like - http://www.loew-cornell.com/product-page-pages-43.php?cid=203&pid=87 in #4 size. I use cheaper brushes because even with very high-quality natural hair brushes, the tip will eventually become too ragged for detail work, so if I need to continually replace the brush, I might as well not spend a ton of money on each brush! For my wash brushes, I do use natural hair, and they last a very long time.
It might seem counter-intuitive, but try the larger brush for your detail work - you'll be surprised!
Huh, very interesting advice on the brushes. I'll try it! Thank you so much for your answer! <3
ReplyDelete